Wednesday, July 24, 2013

Add images part 02-Photoshop part 07

We learnt how to add an image to Photoshop with file menu and open command in previous tutorial (Standard method).Apart from that there are several ways to do the same procedure.We can use Browse command in file menu as second method .Lets have a look at this one


* Go to file and click on Browse(#01 in picture ) .

Then  Adobe Bridge window(#02) will open.Adobe Bridge is file managing software We can access to our folders from here where our photos are stored,and also we have a preview of selected photo in top of the right hand side slid bar(#03 area). there is a meta data collection(file name,file size,resolution,date created,etc)of selected image below its preview.This method becomes somewhat difficult than standard method ,but users can get more information about images if we use Adobe Bridge

Double click on image you want to open.Then it will open with a new
document window as in previous tutorial .


Add images -Photoshop part 06

There are many ways to add images to Photoshop .We would use standard method first !!

*  Go to file menu and click on open command(look at #01 in picture below) .Then you can choose an             image file in your computer easily .

* Once you clicked on Open command ,new window will open (look at #04 in picture below)

*  Select an image file and click open (to select and image use #02 area,select the folder where your picture       is located in your computer)

When you select a file (image), its name and file type will appear in two text boxes below
It is not essential to select a file type,because default file type is given as All Formats(#03 in picture ) .When file type is given as All Formats ,you can see any kind of images to which Photoshop support.If you don't have a specific image type to select,it would be better  to have All Formats option as file type,but if you want to select an unique photo out of huge amount of image files,then you can select its file type and find it very easily .Once you select a file type ,you will be seen that type of images only.
After click open ,it will open in a new document window.If you open another one,then it will open with another document window


Click on picture to see it properly 


* You can close your image by clicking on close button in its document window.If you maximize a photo         ,then other images will be disappeared

* Also you can minimize your document windows


Changes mat colour-Photoshop part 05

This is a very simple tutorial .We have made these tutorials so that beginners can easily understand.We believe shortness and using very simple English will be a help for newbies to Photoshop .

So lets start !!!!!

You can see its default color is gray color .Sometimes we want to change its color.It depends on images background ,contrast and brightness.We should choose a color according  to images above features.


We can change its color with paint bucket tool(look at #01 in picture).Then choose the color you want(one you chose your color it will appear in #02 area ).After that click on mat(#03 area) with pressing Shift key on key board .


Application Interface-Photoshop part 04

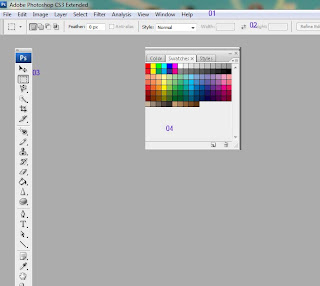
Before we use Photoshop software ,we should study about its interface first,because students must have a wide knowledge about its options and properties by seeing and by handling them to be a good Photoshop expert .


There is a main menu -(#01 area of below picture This is not an unique feature in Photoshop ,you can see this kind of menu too often

there is a tool box -(#03 area )This is also common toolbar among photo editing software

Tools are categorized to separate sections according to its characteristics


Below the main menu you can see the option bar(#02 area of below picture ) .It is adapting according to the tool we have selected in tool box.

In the right hand side you can see few pallets (look at #04 area) .There are lots of pallets and most of the time they are appearing as groups in Photoshop.
ex-:You can see color pallet is appearing with swatches and styles pallets
Click on picture to see it properly 


We can  show ,hidden pallets as well by checking window menu and also we can use key board shortcuts to do the same actions (All the pallets which haven't "right check marks" are hidden pallets ,others are currently appearing in application interface)

Adobe Bridge Icon -This is a file managing software(this icon also appears in option bar) ,you can learn more about this with upcoming tutorials


Tuesday, July 23, 2013

Document window-Photoshop part 3

What is document window ???

In this tutorial ,we learn about  document window.All the images which we import to Photoshop are opened with a document window.That means each image has its own document window.There is a title bar(look at #01 in picture ) at the top of document window with blue color .And also you can see the Photoshop icon at the top of left hand side and the name of our image is appearing next to it .


After the image name, you can see zoom value(#02 in picture ).This shows images current zoom value,and also you can see it in both navigation pallet and in document window at the bottom of the left hand side .Below the title bar,there is a horizontal ruler and vertical ruler(#03).The space between image and rulers is named as mat area (#04 area ).

You can see image information in footer of document window

 Click on picture to see it properly  

Document dimensions(#05)-document size and resolution

Scratch size(#06) -memory we deserve to Photoshop and how much we are currently using of deserved memory (this shows as a ratio).It is very useful to know when we are editing high resolution images

Timing(#07)-The amount of time Photoshop took to do the last action we made

Current tool(#08)-The name of tool ,you are currently using

You can adjust the size of an image by dragging the bottom of left hand side corner .Then you can see horizontal and vertical scroll bars.

Create a new Photoshop file-Photoshop part 2

We can create a new file by selecting new in file(look at number 07 in picture ) menu .We can give it a name(#01 in picture )also if we need .It is not essential to do so because it is optional .We can select various kind of Photoshop documents through the preset selection box(look at #02).Once you select a preset ,you can see width ,height,resolution,color mode properties (all four features in #03 area ) are changed according to the selected preset.


Then you can select a background color too(#04 in picture).

It is possible to check the size of your image before you finish editing (have a look at #06 area).This shows in right hand side of the dialog box. That is the estimated file size if you create /edit an image with the selected settings.It is very important to get an idea about image before we start to create .Additionally we can use the Advanced options(#05 in picture).

In the color profile selection box ,you can choose the color profile you want.For an example if you want to edit an image which has been created with a mac(apple) computer ,then you can select "apple rgb" color profile. if you want to work with scanners you can choose cannon canoscan N340P scanner .We can see this effect only after printing our image .Otherwise we may not see a difference of that image.So we would keep default advanced settings .


Pixel Aspect Ratio selection box shows the ratio between dimensions of a pixel.


After adjusting your settings click OK


Click on picture to see it properly 


Sunday, July 21, 2013

Google Adsense -E money part 5


Google is the world biggest search engine,it is the most popular search engine among north american people .As i mentioned earlier Google started a project as Google Adword and then they started  another project as Google Adsense so that anyone can join it.Google pays 0.01$ - 4$ per click to owner of the blogger.Once you earned 100$ ,then you will be received your money by a cheque from Google


When you are going to apply for Google Adsense it would be better to have a gmail account.if you don't have one ,read this(click on it ) to learn how to make a gmail account step by step

The second step is we should have a web site or a blogger to request an Adsense account.We have learnt in earlier article how to create a free blogger .If you haven't seen it ,please refer to that lesson .It isn't required a deep HTML knowledge or a web designing skills to run a blogger site you just need writing skills!!! You can write on various kind of topics such as new technology,computer tricks,about mobile phones,software ,etc

There are 18 terms of Google for blog owners when they are going to request for an Adsense account,you should read them carefully and must accept them .If you broke a term,then you will be banned !!! Remember this


Apply for Adsense

1)log into your blog and click on Earnings

2)then click on sign up for Adsense

3)Then select a layout (this is for place adds on your blog)

4)click Next

5)put a tick on Create a new Adsense account and click Next

6)fill the form correctly and click on Submit Information
(Select individual as Account type )

7)Then you can see the summery of the information that you entered .Click on continue only if the information are correctly displaying (make sure that your address is correct ,otherwise you may be having
problems when it is time to receive your PIN )

8)These are the Google Adsense policies !! Read these terms carefully and click on accept.

9)Then log into your email and confirm the email from Adsense .Then you can see a message which tells you that your account will be active within 48 hours.